This guide shows a practical, production-minded way to add Stripe Checkout to a Node.js application using Express and EJS. It covers setup, creating Checkout Sessions, redirecting customers, retrieving session and line-item details after payment, and common pitfalls to avoid.
Why use Stripe Checkout with Node.js?
Stripe Checkout is a hosted, prebuilt payments page that handles card entry, localization, and common payment methods. Integrating it from a Node.js backend reduces PCI scope, speeds development, and gives a secure, mobile-friendly payment flow.
Who this is for
- Developers building simple e-commerce flows or one-time purchases.
- Teams that want a secure hosted payment page without building a custom UI.
Overview: how the flow works
- Client requests checkout (e.g., clicks "Proceed to checkout").
- Server creates a Stripe Checkout Session via the Stripe secret key.
- Server responds with the session URL and redirects the customer to Stripe's hosted page.
- Customer completes payment on Stripe; Stripe redirects back to your success or cancel URL.
- Your success route can retrieve the session and line items and record the order.
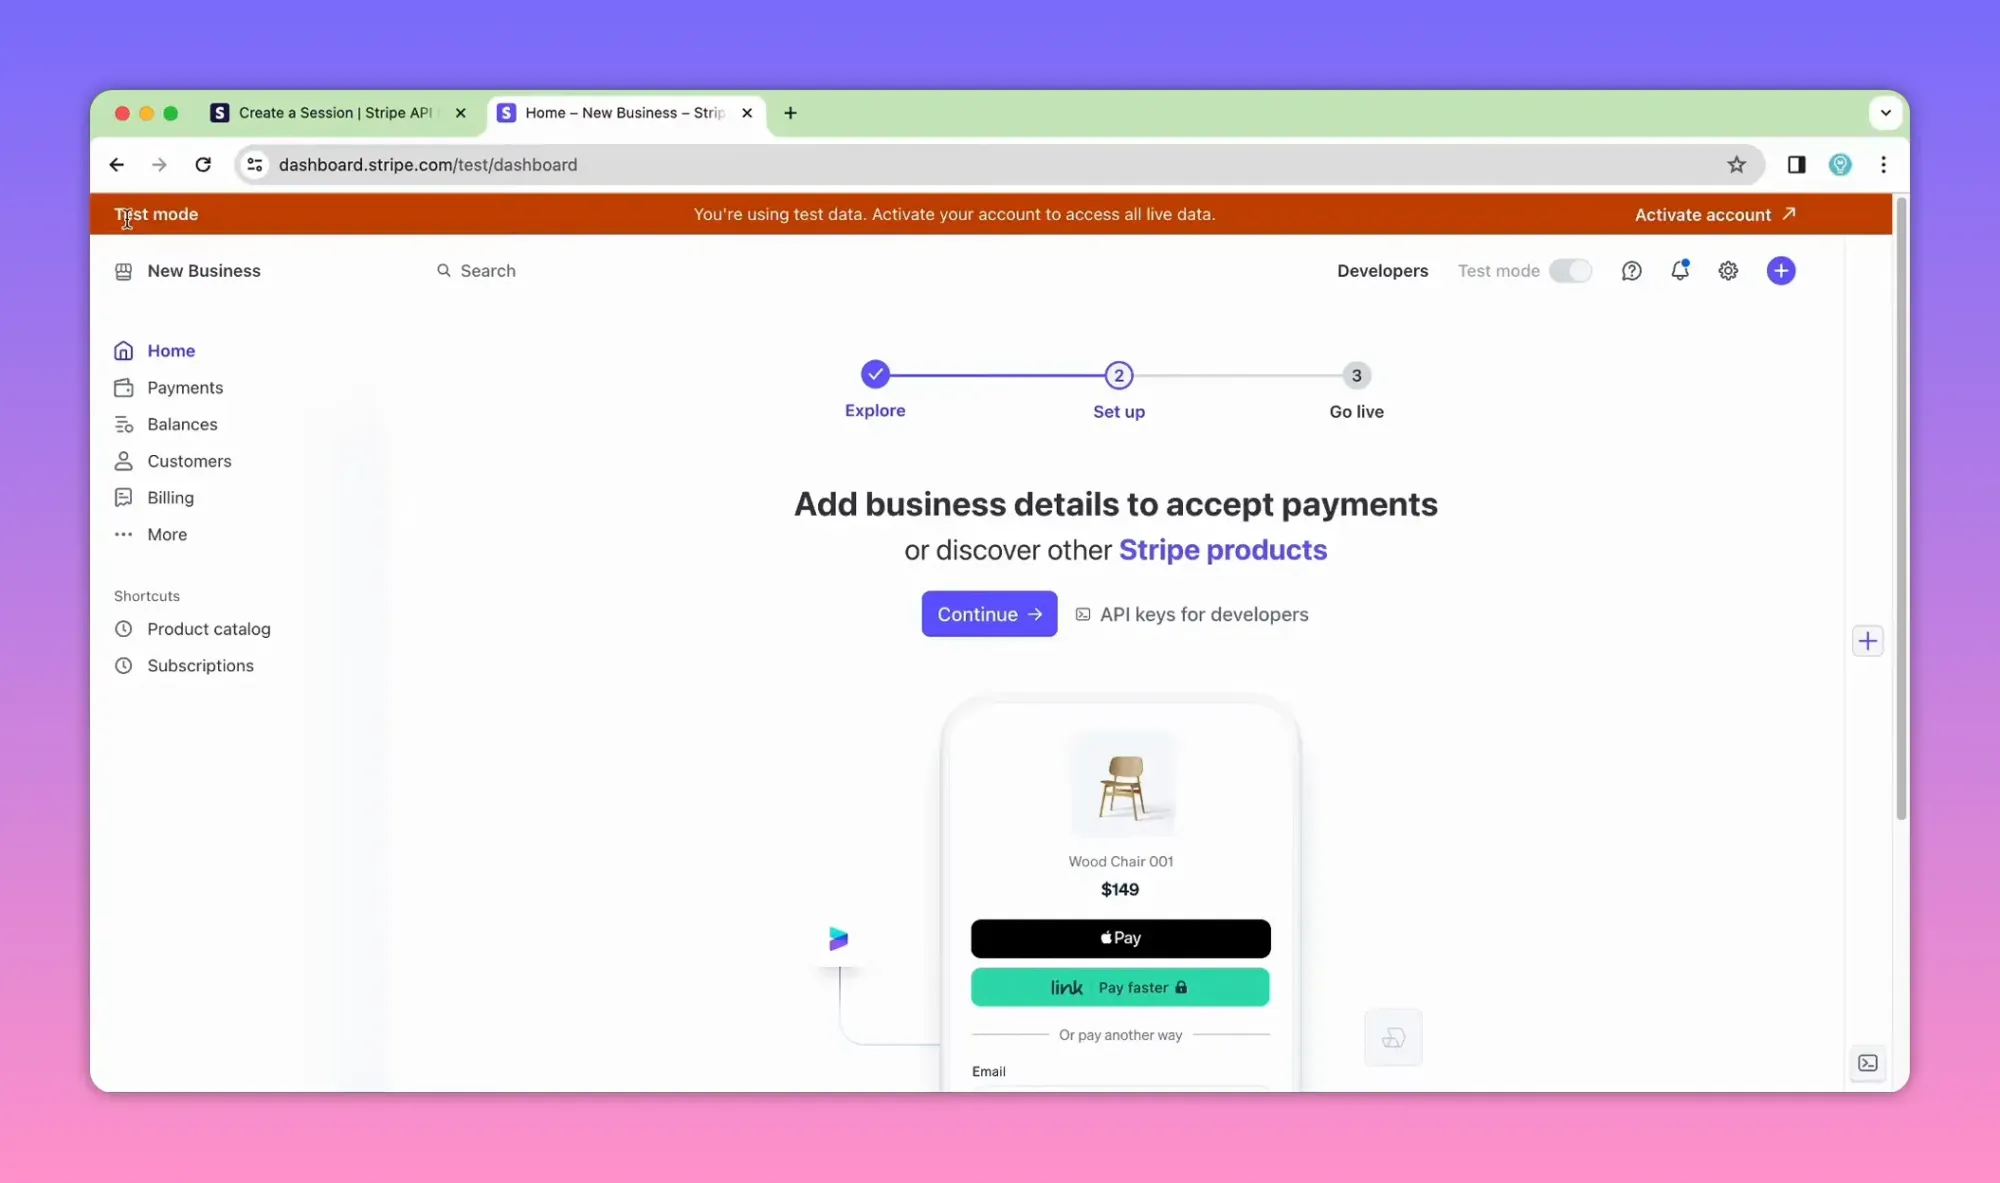
Before you start — required accounts and keys
Create a Stripe account and use test mode during development. From the Stripe Dashboard collect:
- Publishable key — used client-side for Elements (not strictly required if you only redirect to Checkout).
- Secret key — used server-side to create sessions and read resources.
Minimal project setup
Commands to create the project and install dependencies:
npm init -y
npm install express stripe ejs dotenv
# optional: install nodemon globally for automatic restarts
npm install -g nodemon
Basic project layout:
- index.js (main server)
- views/index.ejs (cart page)
- .env (store STRIPE_SECRET_KEY and BASE_URL)
Key environment variables
Store secret data in environment variables (do not hardcode keys).
# .env
STRIPE_SECRET_KEY=sk_test_xxx
BASE_URL=http://localhost:3000
Minimal Express server and view
Create a simple Express app that renders a small shopping-cart page with a form pointing to /checkout.
const express = require('express');
require('dotenv').config();
const stripe = require('stripe')(process.env.STRIPE_SECRET_KEY);

const app = express();
app.set('view engine', 'ejs');
app.use(express.urlencoded({ extended: true }));

app.get('/', (req, res) => {
  res.render('index'); // renders a form that POSTs to /checkout
});

app.listen(3000, () => console.log('Server started on http://localhost:3000'));
Creating a Checkout Session (server-side)
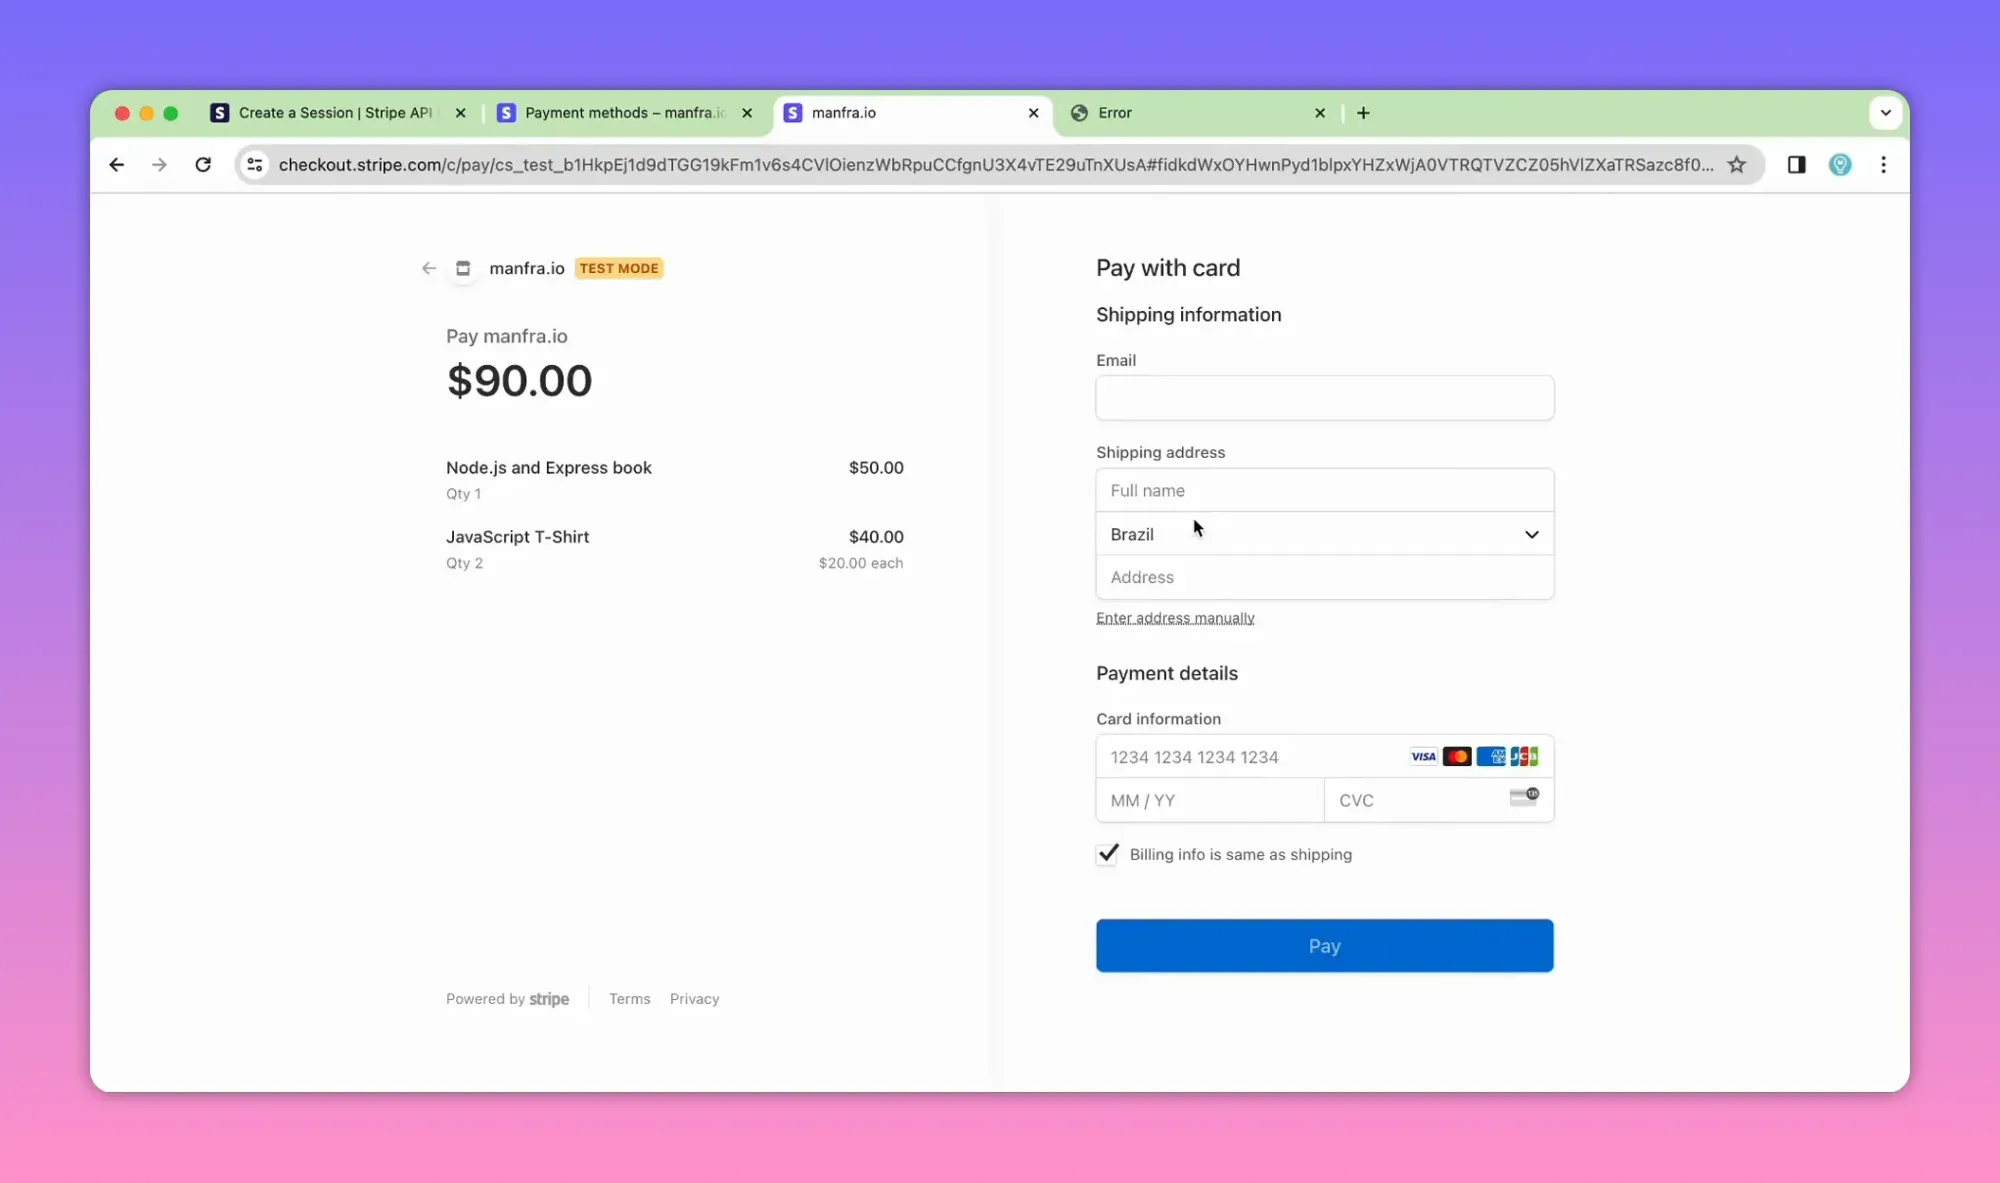
When the customer submits the cart form, create a session and redirect to session.url. Important settings:
- mode: "payment" for one-time charges
- line_items: array of items with price_data and quantity
- success_url and cancel_url — use a BASE_URL from env
- shipping_address_collection — optional array of allowed countries
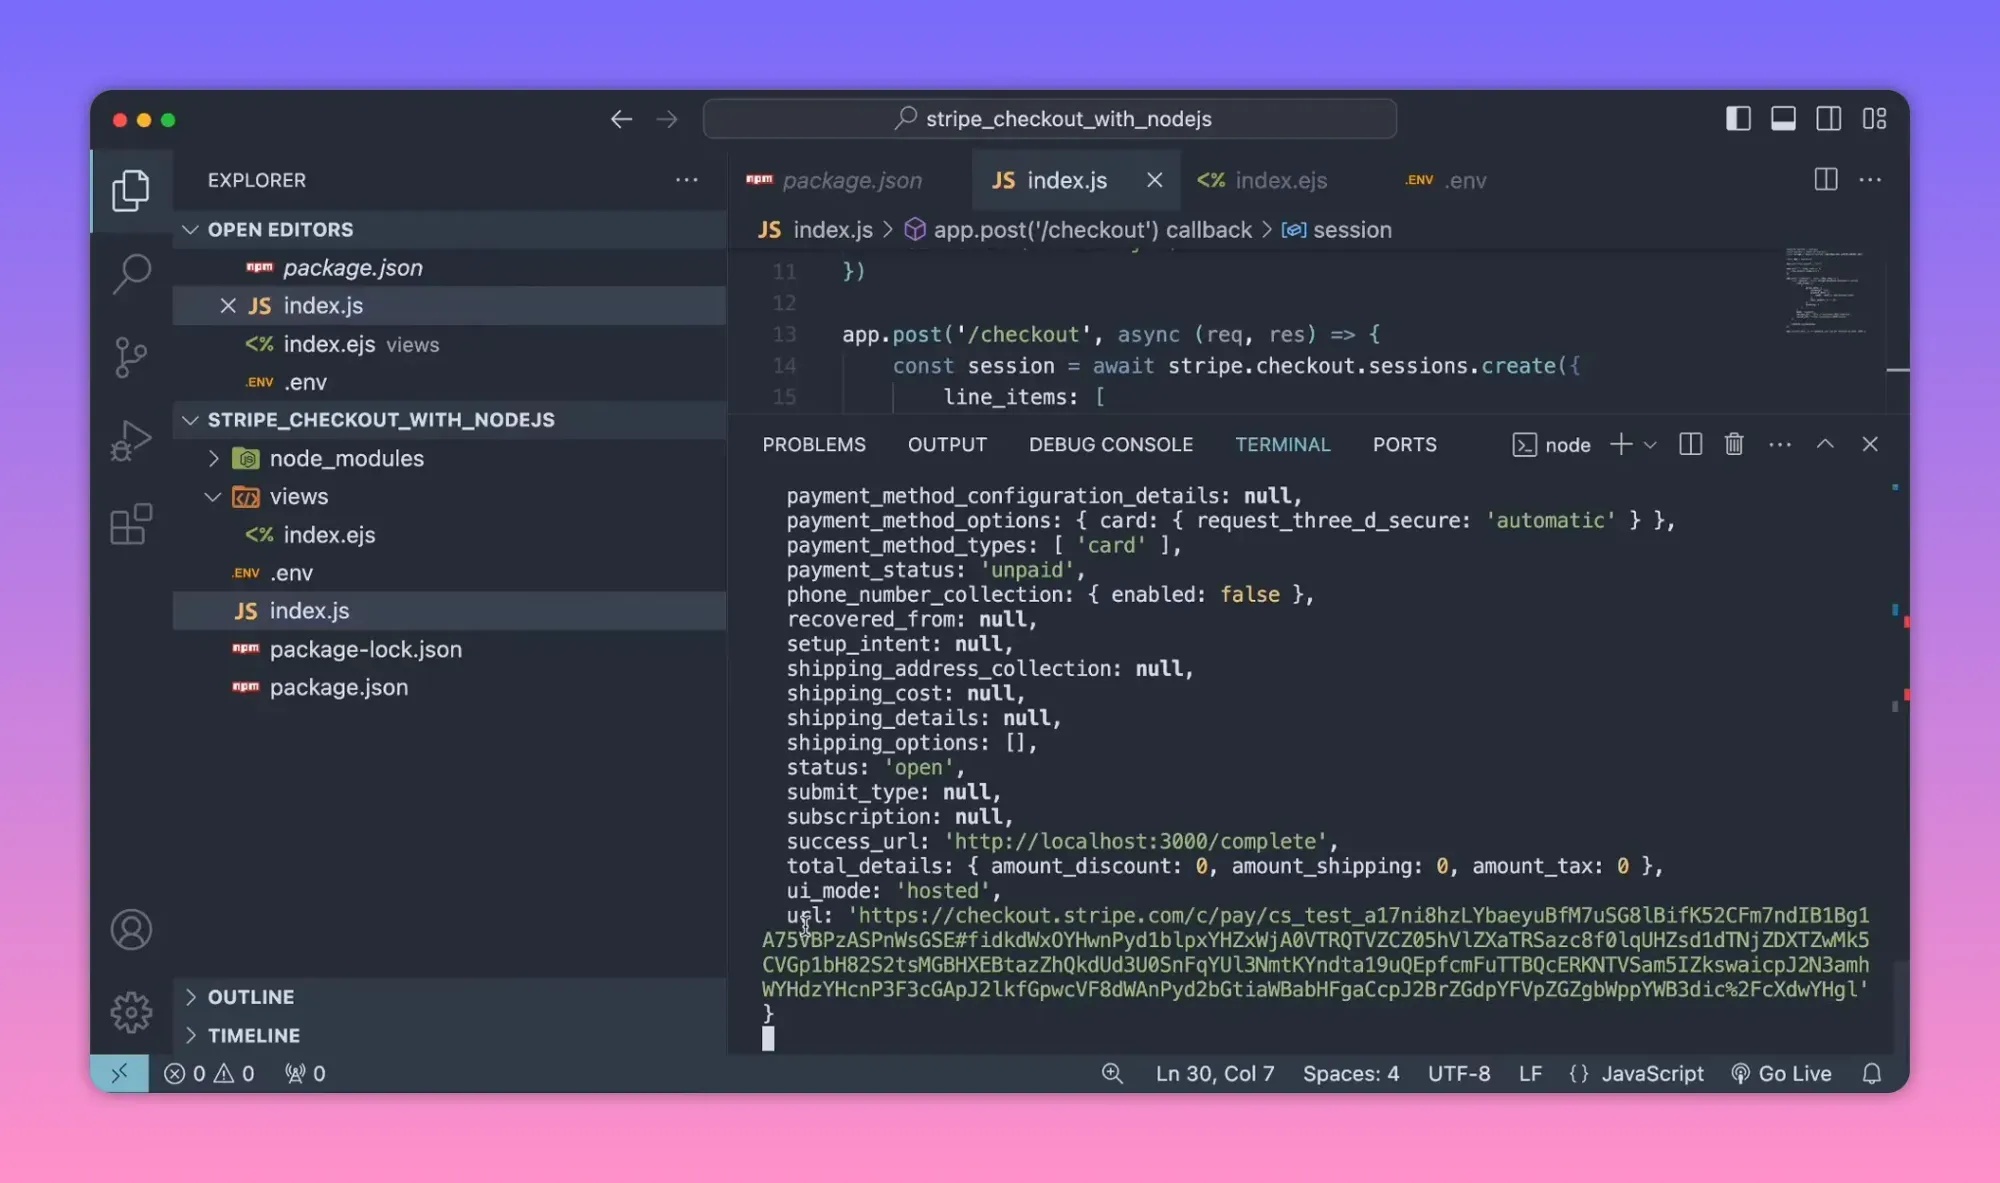
app.post('/checkout', async (req, res) => {
  // Build line_items from your cart (example below uses a fixed cart)
  const session = await stripe.checkout.sessions.create({
    payment_method_types: ['card'],
    mode: 'payment',
    line_items: [
      {
        price_data: {
          currency: 'usd',
          product_data: { name: 'Node.js & Express Book' },
          unit_amount: 50 * 100, // amount in cents
        },
        quantity: 1,
      },
      {
        price_data: {
          currency: 'usd',
          product_data: { name: 'JavaScript T-shirt' },
          unit_amount: 20 * 100,
        },
        quantity: 2,
      }
    ],
    success_url: `${process.env.BASE_URL}/complete?session_id={CHECKOUT_SESSION_ID}`,
    cancel_url: `${process.env.BASE_URL}/cancel`,
    shipping_address_collection: { allowed_countries: ['US', 'BR'] }
  });

  // Redirect the customer to the hosted Stripe Checkout page
  res.redirect(session.url);
});
Common mistakes when creating line_items
- Not converting dollars to cents — Stripe expects amounts in the smallest currency unit.
- Using uppercase currency codes incorrectly — use lowercase in some SDKs, but "usd" is standard in the example above.
- Omitting quantity or giving wrong unit_amount meaning the wrong totals.
Testing the Checkout page
Use Stripe test cards. A common test card that returns success is 4242 4242 4242 4242. Stripe's test mode means no real money is exchanged.

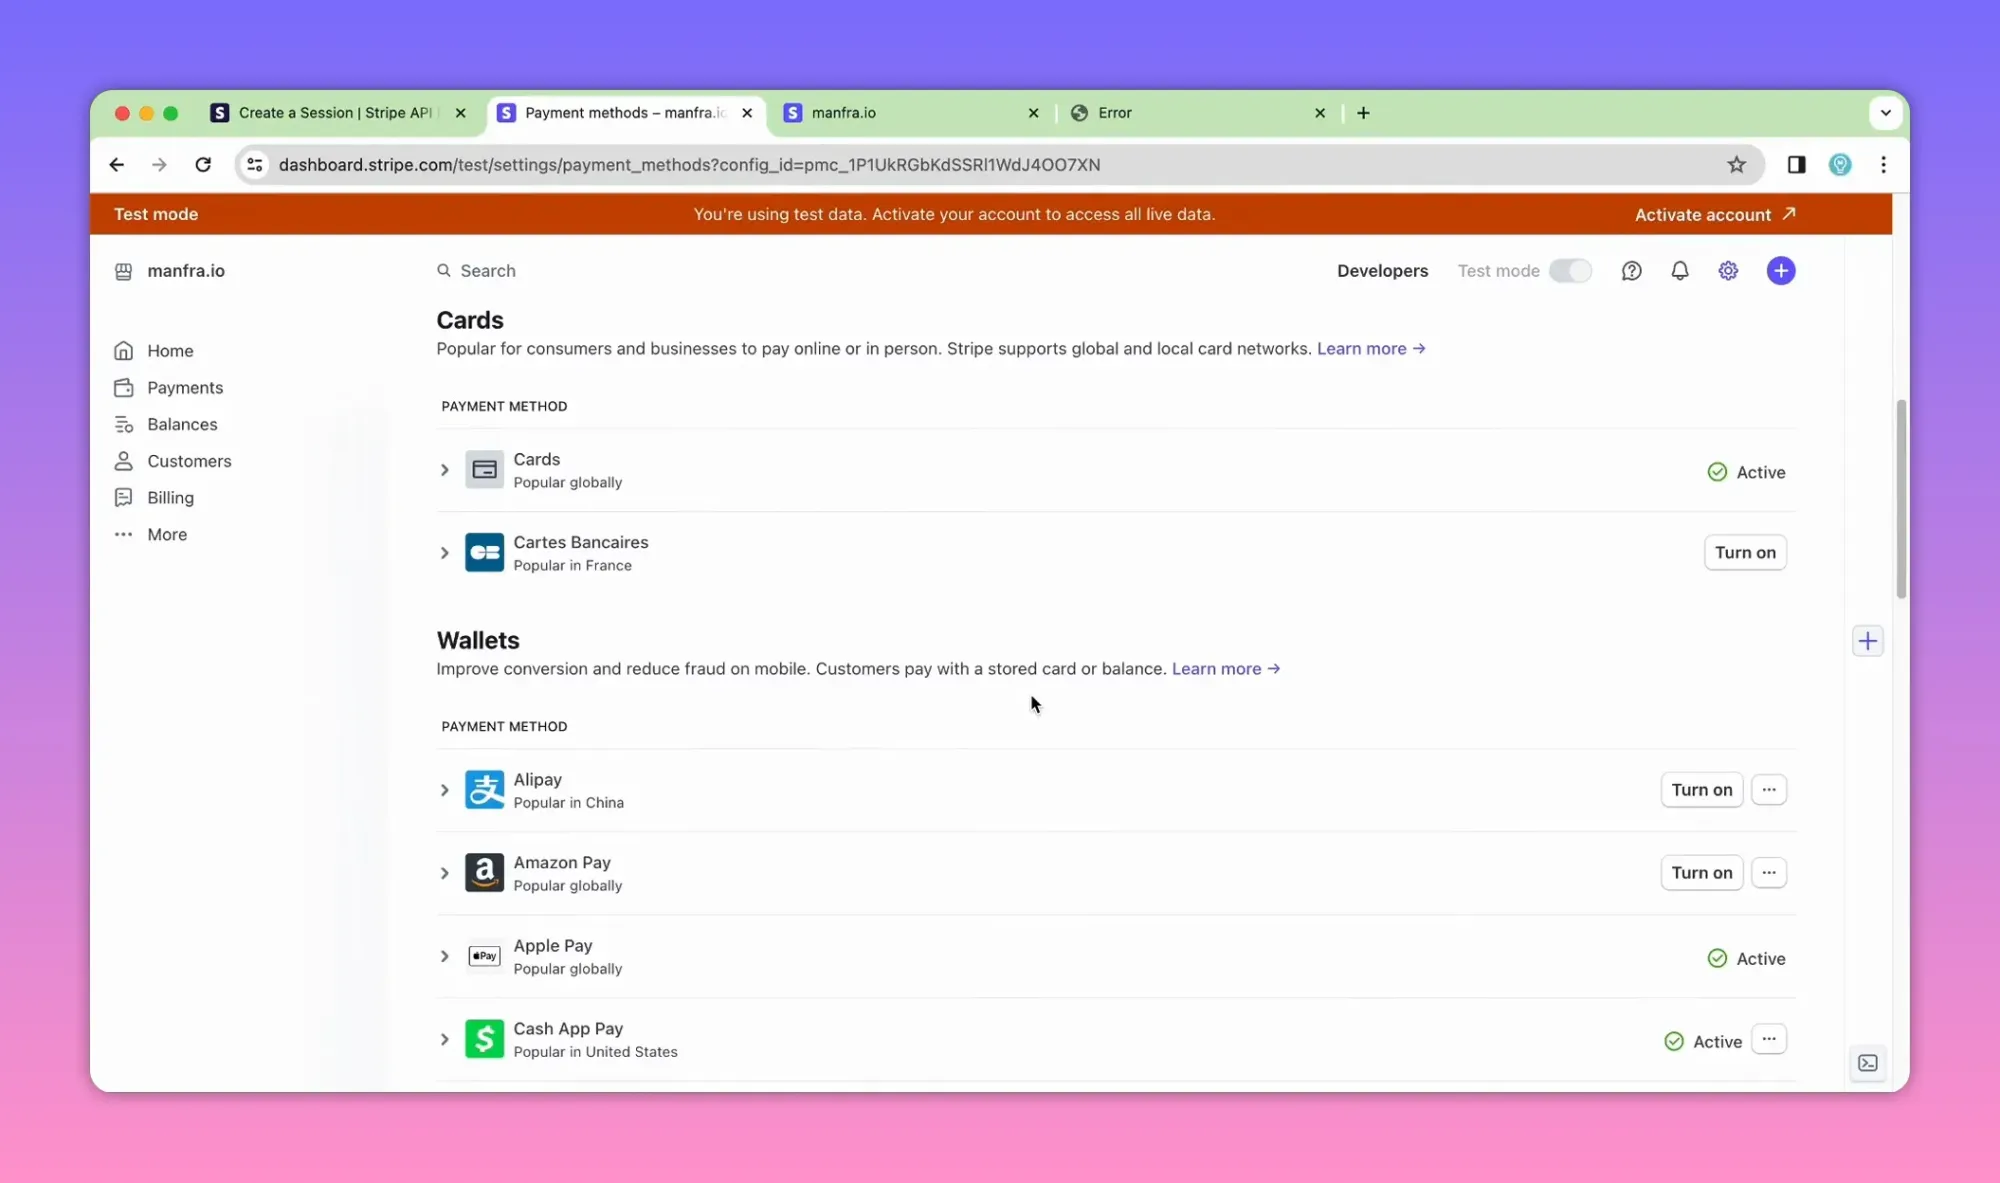
Restricting payment methods
Payment methods shown on Checkout can be configured from the Dashboard under Settings → Payments → Payment Methods. Toggle the payment methods you want available to customers.
Success and cancel routes
Create simple server-side routes to show order confirmation or handle cancellations. On the success route you should retrieve the session details and store the order in your database.
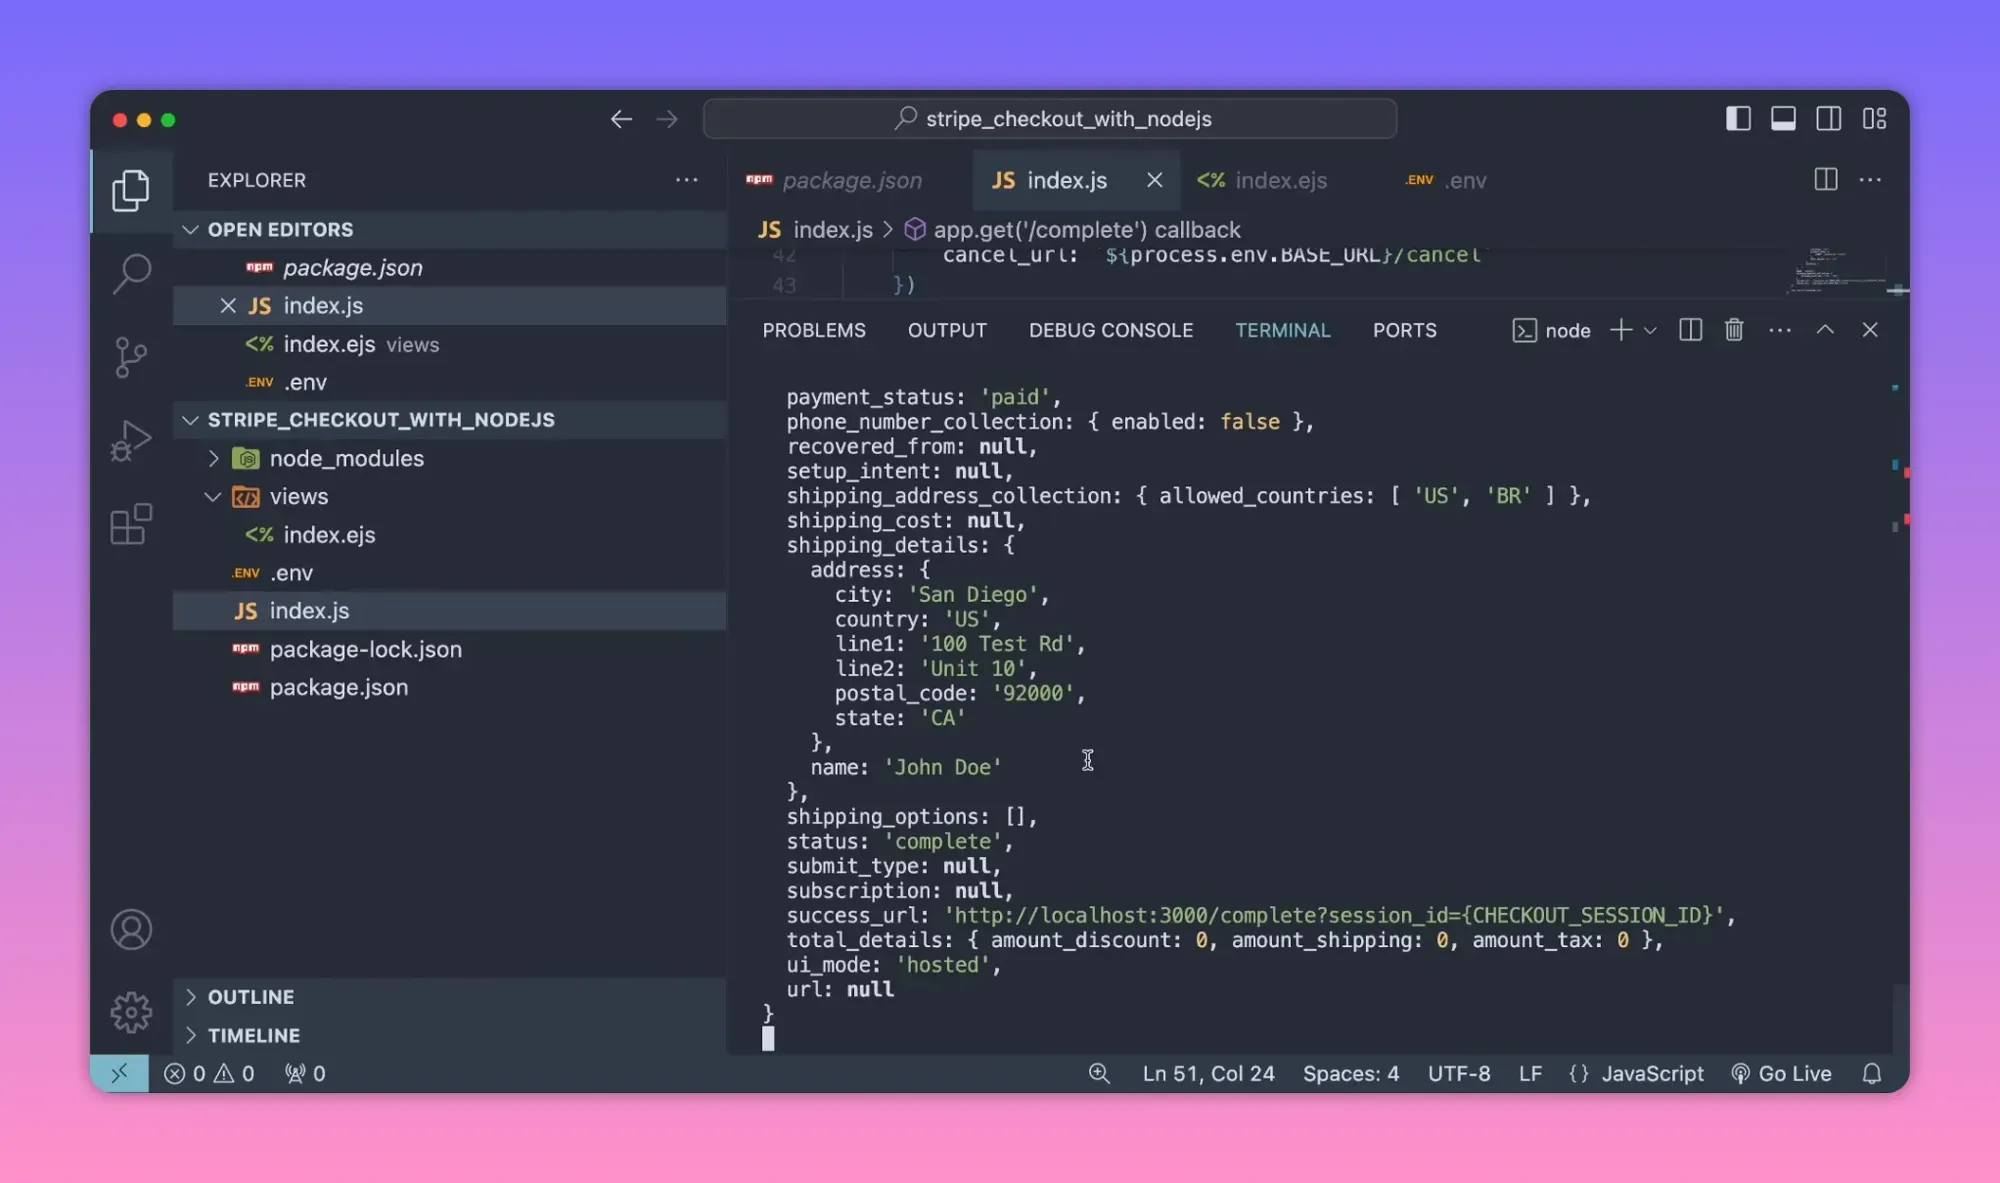
app.get('/complete', async (req, res) => {
  const sessionId = req.query.session_id;
  if (!sessionId) return res.status(400).send('Missing session_id');

  // Retrieve session and optionally expand the payment_intent to get card details
  const session = await stripe.checkout.sessions.retrieve(sessionId, {
    expand: ['payment_intent.payment_method']
  });

  // Retrieve line items separately
  const lineItems = await stripe.checkout.sessions.listLineItems(sessionId);

  // Store session, payment and lineItems in DB, then render a confirmation page
  console.log(session);
  console.log(lineItems);
  res.send('Payment successful');
});
Optimizing server calls: retrieve details in parallel
listLineItems and retrieve are independent. Run them in parallel with Promise.all for better performance.
app.get('/complete', async (req, res) => {
  const sessionId = req.query.session_id;
  const [session, lineItems] = await Promise.all([
    stripe.checkout.sessions.retrieve(sessionId, { expand: ['payment_intent.payment_method'] }),
    stripe.checkout.sessions.listLineItems(sessionId)
  ]);

  // session.payment_intent now includes expanded payment method details
  // lineItems contains purchased products
  res.send('Payment successful');
});
What to store in your database
- Stripe session id and payment intent id for later reconciliation.
- Customer email, shipping address, and billing info (if needed).
- Line items with product ids, quantities, and unit price used to compute totals.
- Payment method last4, brand, and status if you need to contact the buyer.
Security and production checklist
- Never expose secret keys to the client. Use environment variables and a secrets manager in production.
- Use live API keys in production and test keys locally. Keep separate accounts or Stripe connected accounts per environment if needed.
- Verify amounts server-side. Do not trust client-sent prices or quantities.
- Use webhooks to confirm payment and handle asynchronous events before fulfilling orders (recommended).
- Enable idempotency keys on expensive or retry-prone server calls to avoid duplicate charges.
- Set up proper logging and alerting for failed payments and webhook signatures verification.
Webhooks: why you need them
Relying only on the redirect success URL is fragile. The recommended approach is to use webhooks for final confirmation because redirects can fail or customers may close the browser. Configure a webhook endpoint to listen for events like checkout.session.completed and payment_intent.succeeded.
Common pitfalls and troubleshooting
- Missing session_id on success URL: Make sure success_url includes
?session_id={CHECKOUT_SESSION_ID}. - Wrong currency or amount: Remember Stripe expects amounts in the smallest currency unit.
- Shipping countries format: use two-letter ISO country codes, e.g. "US", "BR".
- Production mis-configuration: Double-check you use the live secret key in production and update dashboard settings (payment methods, webhook URLs).
- Webhooks not verified: Always verify signatures on webhook requests to prevent spoofing.
Quick checklist before going live
- Switch to live Stripe keys (publishable and secret).
- Update BASE_URL to your production domain.
- Set webhook endpoint in Dashboard and verify signatures server-side.
- Test a full purchase flow in test mode, including edge cases: card decline, network loss, cancelled payments.
- Make sure receipts, emails, and tax calculations are correct.
Additional tips
- Display clear order summaries before redirecting to Checkout to reduce disputes.
- Use metadata on Checkout Sessions or PaymentIntents to attach your internal order id for easier reconciliation.
- For subscriptions use mode "subscription" and configure prices in the Dashboard or via API.
Resources
- Stripe API docs — Checkout Sessions and listLineItems
- Stripe test card numbers and testing guide
Summary
Integrating Stripe Checkout with Node.js and Express is straightforward: create Checkout Sessions on the server using your secret key, redirect customers to the hosted Stripe page, then retrieve session and line-item details on your success route (or, better, confirm via webhooks) and store the order data. Follow best practices for keys, testing, and webhooks to build a reliable payments flow.